You use the Enter Credit Item screen to maintain the items to be credited.
Refer to "Creating a New Credit Note" or "Recalling a Held Credit Note".
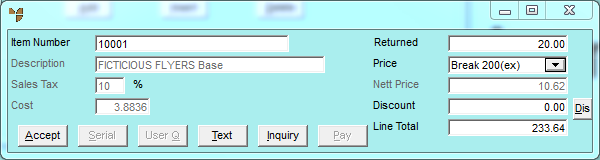
Micronet displays the Enter Credit Item screen.
![]()
If you are posting an open credit, you simply add the item(s) to be credited on this screen. Continue from step 5 below.
Micronet redisplays the Enter Credit Transaction screen showing every item sold and the actual sell price that appeared on the tax invoice. You can then delete any items you don't want to credit from the credit note. You can also add items to the credit note or maintain item details, such as entering the number of items returned.
![]()
|
|

|
Technical Tip If you loaded an invoice, highlight any items the customer has kept and select the Delete button. Micronet removes the items from the credit note. The items remaining on the credit should only be the items the customer is returning. Alternatively, amend the lines to reflect the actual items and quantities returned. |
If you selected to add, insert or edit an item, Micronet displays the Enter Credit Item screen.
|
|
Field |
Value |
|---|---|---|
|
|
Item Number |
Enter or select the ID of the item to be credited. |
|
|
|
Technical Tip If your company is configured for multiple bin locations and your userID allows you to edit bin locations, Micronet displays the Bin Locations and Quantities screen. Refer to "Enter Credit Item - Selecting Bins and Quantities" for more information. If Micronet has been setup to use the Main Bin Only or Priority Order and you do not have authority to edit bin locations, the selection of bins will be automatic and performed in the background. |
|
|
Item Description |
Micronet displays the description of the selected item. |
|
|
Sales Tax |
Micronet displays the GST or sales tax applied to this item. |
|
|
Cost |
Micronet displays the average cost for the item from the Item master file (refer to "File - Inventory - Purchasing"). |
|
|
Returned |
Enter the quantity of the item being returned. |
|
|

|
Warning Make sure you update the quantity if you loaded an invoice into this credit note and the customer is not returning the full quantity of an item they purchased (e.g. they are returning one item but keeping four of the same item). |
|
|
Price |
If you loaded an invoice into this credit note, Micronet displays the price charged for the item on the invoice. If you are processing an open credit, Micronet defaults to the default price set in the Debtors master file. You can change the price if you have the appropriate user access. Select the price break for the item; Micronet displays the selected item price. If you select Nett in this field, you can enter a fixed price in the Nett Price field. You can only change pricing if the Override Invoice Pricing field on the User File Update screen - MDS Security tab is set to Yes (refer to "Maintenance - Edit UserIDs - 4. MDS Security"). If you do, details are stored in the Price Override Audit file for management reporting purposes |
|
|
Nett Price |
If you have loaded an invoice to credit, Micronet displays the net price based on the debtor/item pricing matrix. You should not change the invoice price. If you are processing an open credit and you have the appropriate user access, you may enter the net price you want to credit. |
|
|
|
Technical Tip You need to be aware of whether your net prices include or exclude GST. For more information, refer to "Edit - Program - Tax". |
|
|
Discount |
If you have loaded an invoice to credit, Micronet displays the total of any discounts applied to the invoice. You can check the discount breakup by selecting the Dis button. Micronet displays the Discount Breakup screen.
Micronet displays the amount of the total discount assigned to each discount category. Select the Accept button to return to the Enter Credit item screen. If you are processing an open credit, enter the amount of any discount that applies to this invoice. To assign the discount to specific discount categories, select the Dis button. |
|
|
Line Total |
Micronet displays the total value of the line minus any discounts. |
If you added an item, Micronet redisplays the Enter Credit Item screen so you can add further items to be credited.
